Showing posts with label learning curve. Show all posts

Friday, 28 September 2012

I have just started studying - Early Netherlandish Art - Part 1

This week I started a course with the WEA - Workers Educational Association here in Colchester to study Early Netherlandish art.. Well I'm as surprised as you.. !  Well, I have this friend.... Who also has a hidden passion for medieval art... Need I say no more...

"The course will introduce the art and social climate of the Fifteenth Century Northern Renaissance via the exploration of the amazing artistic techniques of the painters such as Jan Van Eyck, Rovert Campin and Rogier Van Der Weyden."  Says the blurb...  This sounds a bit heavy but I think that it will be an exciting journey..

Week 1:  The Dukes of Burgundy 
Duke of Burgundy Philip the Bold, France 
Philip the Bold - Philippe le Hardi 1364 -1404
Duke of Burgundy John the Fearless, History of France
John the Fearless - Jean sans-Peur 1404- 1419
 
 Philip the Good - Philippe le Bon 1419 - 1467
 
Charles the Bold - Charles le Téméraire 1467 -1477
 There were four Dukes of Burgundy in these golden years between 1364 and 1477: Philip the Bold, John the Fearless, Philip the Good and Charles the Bold. Each married well, so increasing the Duchy’s cross-border land and power. The Low Countries, what we know now as Belgium and the Netherlands, were amongst the rich gains bringing untold craft skills, culture and prosperity. A sumptuous court resulted where every aspect of the arts was patronised: tapestries, music, sculpture, gastronomy and fine arts. Burgundy blossomed, gaining in stature and power.

We also took a look at the book of hours other wise known as Très Riches Heures du Duc de Berry . This will blow your mind, so much detail.. So amazing.. 
I am totally hooked.. And looking forward to next week...

Monday, 4 July 2011

I've just been on a printing course at Cuckoo Farm Print workshop with the amazing Jill Desborough and learnt how to do soft ground etching .  I also took my first tentative steps with aquatint...
I started off with a drawing,  a Jackdaw in a cage, a piece of zinc was cut to the size of the drawing.   Then the zinc plate is meticulously cleaned with whiting, washing up liquid and a barbers shaving brush.
The plate is then thinly coated with a softground.This is done by putting the plate to warm on a hotplate, a very small amount of the 'ground' is applied and then roller'ed to create a very thin coating, changing the colour of the zinc from silver to golden syrup.

My plate was then laid on a sheet of paper, I drew around it for registration then my drawing was laid on top, the edge of the drawing was sellotaped to the sheet of paper underneath with the plate making a sandwich in the middle, so that I didn't move whilst I was transferring the drawing.

When I'd finished drawing the plate was placed into the acid bath for a few minutes to allowing the acid to etch the areas which had been removed by my drawing....This is the 'transfered' drawing to the plate. 
The plate is then cleaned, inked up and printed.  At this stage it was all a bit disappointing.
So I did a little dry point etching, drawing into the plate with an etching needle, adding a little detail.
Then another print was taken. The plate was cleaned once again.  Improving?... A little. it shows the etched lines
The next stage was the aquatint, with a newly cleaned plate, all ink removed, the plate was put into the aquatint box, it was switched on for a split second then the 'rosin' was allowed to settle onto the plate for a couple of minutes. This stuff 'Rosin' is a carcinogenic so health and safety precautions where taken.
The plate was then very gently heated.
Next step I applied 'stop out' varnish to the areas that I wanted to keep brightest.  Back in the acid, this time it was stronger.  It was in there for 30 seconds, then rinsed.
Then back to the stop out varnish and the acid bath..Twice more. 
Final prints... Paper a bit cockled, but you get the idea.
What a day, my brain ached, so much information, so much to learn, immediately booked another day with Jill.  My brain was on overload..... And all for an amazing £25.  For the day!!!  What a bargain.

Then a quick dash home, hair wash, bath....  Which I desperately needed to relax, and then off out to the most amazing dinner party that I have been to in a very long time.

Needless to say I was exhausted yesterday....Too tired to blog...... Too much brain work yesterday  too many Pimms and far too much wine.... And great food... I'm on a diet starting today.. Ha!  And blogging...

*** Now I'm off to the post office.... I have a parcel from America waiting... WHO?  Has sent me a parcel? Exciting... ***


Thursday, 20 January 2011

Take...Collagraph journey with me .... A tutorial..

I have finally got around to finishing this tutorial, with one thing and another I just haven't got around to it.

It could all go wrong... but here goes..

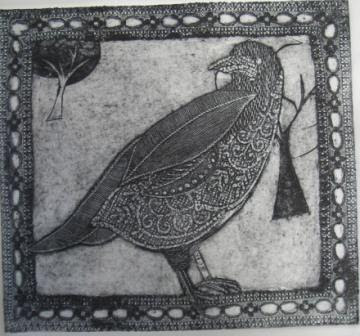
'ROOK'
This is the story of one of my first collagraph prints...

It started with a rook in my garden.. I was so surprised to see it, needless to say no camera to hand.  So with a quick look on the internet I found a photo of a rook that I liked, printed it and traced it.
Then off to get samples of textured wall paper, you know the stuff.. the wallpaper that no one wants... I now have samples for the world, and cannot walk past a wallpaper aisle without taking a few samples .  I often wonder what the the staff think of me.....  'A wallpaper bag lady'   I wonder if they think that I decorate my walls with the stuff... Yuck!....... I think that I am doing the DIY shops a service, by taking some samples and recycling it... That is my story and I'm sticking to it.
Anyway, I diverse.... On a piece of stiff card I turned the rook over an placed the tracing on the card and re-drew the rook so that the drawing was transferred onto the cardboard.  Remembering that when it is printed the image will be reversed.


If you want to see how I made this collagraph plate just click on the link A collagraph tutorial or on the side bar  at  'Other places'.


I love doing collagraph but have so much to learn, If anyone has any advice, all is welcome, I appreciate all the help I can get.

If on the other hand anyone would like to ask me a question please just ask.

Thursday, 9 September 2010

What a clever old girl

A new Shop!! 
....to be exact.

'Mycuriosityshop' 
I have just opened myself a bigcartel shop. It has taken me all day to work out the most simple of things how to get it linked to my blog. I am so dense sometimes... It must be my age.

So I emailed the bigcartel, and a lovely lady called Karen was there to help... Me being me, still couldn't work it out...doh!  A few more emails... And a bit of brain work...Ouch!  What I would call joining up the dots so to speak... And I've done it.  Drum roll please.....Just one item in it so far...
'Mask'
(From my 'Sail boats and Theatricals' series)
...But hey, that's another computing thingy that I've learnt.  Wonders will never cease.  I am hoping that it will be simpler for me to use than Etsy... we shall see.

*Apparently the paypal sorts out the currency exchange rates.. Job done! Hurrah...Sweet dreams everyone. Good night.

Tuesday, 31 August 2010

Collagraph lessons at Cuckoo Farm

Alan Brown was the tutor... with a welcome..... just call me Al...

A great tutor with a VERY dry sense of humor... He said... that he wanted us to try 'anything' to make our collagraph plates and have fun experimenting, not to be too precious...and that making a mistake could be the best thing that we achieved that day... I liked this man.

So first up we made some experimental plates... Like nothing I had done before... Mine consisted of cardboard, glue, metal shim, a fern leaf, fabric and tissue... oh and a bit of sandpaper...
These are the prints from my experimental plates... Cyan ink.. I love it, and I was pleased with my prints

We also printed the plates that we had previously made at home.
 
'Beach huts'
The 'beach huts' were inked up with oil paint mixed with a medium which changes it into ink..??? I'd never heard of it so it was worth a try... quite a fun result.
 
'View across the river'
... loving the cyan ink
 'Rook' 
...Which I was thrilled with.

I had a grand day...  loved every moment, met the wonderful 'Dry Al' also a fascinating lady called Julia  who taught art in London, a creative lady called Alex, who had made some fantastic collagraph plates without touching glue, and a chap called Steve who was a bird watcher... he said that my rook was a partridge... I don't know what he means...???  It is what I say it is! .......... Maybe it's a bit like a partridge. Shhhhhhh....

MOST IMPORTANTLY... 
I am desperately seeking an etching press
 If anyone has one or knows of one that is for sale please email me....
mycuriousteaparty@googlemail.com  
Thank you

Monday, 26 July 2010

Etching efforts..

... At Cuckoo Farm Studio's
Yet another steep learning curve, why do I put myself through this?
Oh......I remember... I LOVE it.

I have now attended three of my four one day printing courses.  They have been wonderful, and being taught my such talented printmakers is a joy. The studio is a large airy room with several work areas and and 4 printing presses...well that's as many as I counted, together with a room for acids and cleaning and a large cupboard for aquatint. Not forgetting tea making facilities... Very important. 

Our tutor for the day was a very talented printmaker called Jill Desborough she does the most amazing work, do look her up you will not be disappointed. 
http://www.12printmakers.co.uk/jd.html
So this I what I produced, a soft ground etching of a starling, using two zinc plates.  There are quite a few stages to doing a soft ground etching and as I said, I was on a steep learning curve, or remembering curve as the case may be... over 20 years since I last did any etching...Have I mentioned that I loved it?....It was wonderful.
Here are the two plates

*Note the handy use of the egg tray, I can pick up the plates without touching the surface..Which is a no, no... fingerprints are not good when etching.

Tuesday, 18 May 2010

I've just found these quotes..

...they have helped me with my question.. 'Am I an artist or craft person?' 
......... leaning more and more towards craft.

Edmund de Waal
Practitioner

'Craft is a starting place, a set of possibilities.
It avoids absolutes, certainties, over-robust definitions, solace.
It offers places, interstices, where objects and people meet.
It is unstable, contingent.
It is about experience. It is about desire.
It can be beautiful.'

*************************

Rosy Greenlees
Director, Crafts Council

'Contemporary craft is about making things.  It is an intellectual and physical activity where the maker explores the infinite possibilities of materials and processes to produce unique objects. To see craft is to enter a world of wonderful things which can be challenging, beautiful, sometimes useful, tactile, extraordinary; and to understand and enjoy the energy and care which has gone into their making.'