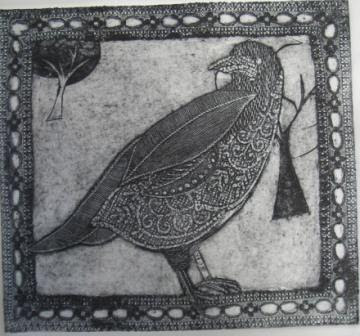
'ROOK'
This is the story of one of my first collagraph prints...
It started with a rook in my garden.. I was so surprised to see it, needless to say no camera to hand. So with a quick look on the internet I found a photo of a rook that I liked, printed it and traced it.

Then off to get samples of textured wall paper, you know the stuff.. the wallpaper that no one wants... I now have samples for the world, and cannot walk past a wallpaper aisle without taking a few samples . I often wonder what the the staff think of me..... 'A wallpaper bag lady' I wonder if they think that I decorate my walls with the stuff... Yuck!....... I think that I am doing the DIY shops a service, by taking some samples and recycling it... That is my story and I'm sticking to it.
Anyway, I diverse.... On a piece of stiff card I turned the rook over an placed the tracing on the card and re-drew the rook so that the drawing was transferred onto the cardboard. Remembering that when it is printed the image will be reversed.
Next the fun bit cutting up that awful wall paper into usable shapes. This is not as easy as it looks, decisions, decisions... I gradually made some and the rook began to take shape gluing them in place as I went. This was a mistake...
Next the fun bit cutting up that awful wall paper into usable shapes. This is not as easy as it looks, decisions, decisions... I gradually made some and the rook began to take shape gluing them in place as I went. This was a mistake...
*Reminder to oneself - Decide on the bulk of the pieces first before using the glue pot.... It is a pain the the proverbial butt to change things around when the glue has dried.
When my rook was almost finished I cut out some tree shapes and lifted off the top layer of paper, my wonderful instruction book says that this is worth a try...
Collagraphs by Brenda Hartill and Richard Clarke
Then I glued on some old lace that I got from a charity shop and added the rooks foot to come down over the lace.
Then on with the button polish, this stuff was a nightmare to find and extreemly expensive.I have since found out that water based matt varnish and PVA does the same job and costs a lot less. I will give them a try when I run out of the button polish.
Close up shows the different texturesAt last a print, I will take a better photo and a better print when my new press is up and running.
I love doing collagraph but have so much to learn, If anyone has any advice, all is welcome, I appreciate all the help I can get.
If on the other hand anyone would like to ask me a question please just ask.


Oh Julie, I love your image and all the textures of the rook. How wonderful. I don't even know what collagraph is but I'm off to the internet to look at it further. Do you actually use your creation to print with? It is simply gorgeous!
ReplyDeleteJulie, this has worked really well. Love your rook. I don't know much about collagraph either but this inspires me to read up on it.
ReplyDeleteThis is very imaginative, I love rooks, ravens and crows and will definately have a go at making one too. It was beautiful before but adding the button polsih gave it a rich and sumptuous look.
ReplyDeleteThanks for the tutorial !
PS The wallpaper shops here on the continent don't take kindly to sample gatherers, so I will have to improvise, but I know what you mean by "the wallpaper that no one wants..." we had some on the walls of our (now renovated)home when we bought it. Darn how I wished we hadn't thrown it away!
Dear Julie,
ReplyDeleteMammarte from Australia here. I am a female artist and creative person, was just googling Collograph printing which I am starting in 5 days. Excited. Found your blog - love your stuff, sounds like we have heaps in common as art friends.
Julie
ReplyDeleteI have done lots of collagraphs and I use lots of different materials such as eg the different grades of sandpaper you can buy, also all the different acrylic gels and mediums.......and of course carborundum in the various grits ie fine medium and coarse. I am enjoying looking through your blog. Really ought to get away off to bed.
Wish I had a proper press, only use a pasta maker so small pieces only
ReplyDeleteLove the bird
shelagh
http://shelaghfolgate.blogspot.com
Thank you for your instructions on creating this collagraph. I'm taking a printmaking class and our first project is to make a collagraph of any image we like. I'm hoping to come up with an image soon so I can get this thing printed and turned in!
ReplyDeleteWow, that is so beautiful and your tutorial was wonderful, thank you.
ReplyDeleteLorraine, it seems such a long time ago that I did this, thank you for reminding me of it.. I must get back to doing some more collagraph printing this year.
Delete